B. Lovely Events

For The Love Of Pretty!

  • Home
  • Holiday
    • Groundhog’s Day
    • April Fools Day
    • Easter
    • Cinco De Mayo
    • Earth Day
    • Mother’s Day
    • Father’s Day
    • National Donut Day!
    • 4th of July, President’s Day
    • Columbus Day
    • Halloween
    • Hanukkah
    • Christmas
    • New Year’s Eve
  • Parties
    • Trends
    • Real Party
    • Pineapple Party
    • Olympic Party Ideas
    • Star Wars
    • Star/ Galaxy Party
    • Summer BBQ Party
    • Summer Party
    • Super Bowl, Football Party
    • The Masters, Golf Party
    • The Oscars, Movie Party
    • World Cup, Soccer Party
    • World Series, Baseball Party
  • Occasions
    • Baby Shower
    • Baptism & Christening
    • Bar Mitzvah
    • Bat Mitzvah
    • Graduation
    • Bridal Shower
    • Baby Shower Inspiring Tablescapes
    • Boys Birthdays
    • Girls Birthdays
    • Engagement Parties
    • Rehearsal Dinner
    • Wedding Ideas and Inspiration
  • Contact
    • About
    • Advertise
    • Contact
    • Submissions
    • Become A Sponsor
    • Privacy Policy
    • Disclosure Policy
    • Quotable Sundays
    • Giveaways
  • Our Shop
  • Facebook
  • Instagram
  • Pinterest


  • → Home
  • B. Lovely Originals
  • Holidays
    • Groundhog’s Day
    • Valentine’s Day
    • St. Patrick’s Day
    • April Fools Day
    • Earth Day
    • Easter
    • Cinco De Mayo
    • National Donut Day!
    • Mother’s Day
    • Father’s Day
    • 4th of July, President’s Day
    • Halloween
    • Thanksgiving
    • Hanukkah
    • Christmas
    • New Year’s Eve
  • Parties
    • Trends
    • Real Parties
    • Dinner Parties
    • Mardi Gras
    • Dog Birthday Party
    • Children’s Party
    • Kentucky Derby Party
    • The Oscars, Movie Party
    • Golden Globe Party
    • Grammy Party
    • Beach Party, Pool Party
    • Pineapple Party
    • Summer BBQ Party
    • Back To School Party
    • Fall Party & Decor
    • Super Bowl, Football Party
    • March Madness, Basketball Party
    • The Masters, Golf Party
    • World Series, Baseball Party
    • World Cup, Soccer Party
    • Olympic Party Ideas
    • Star/ Galaxy Party
    • Olympic Party Ideas
    • Ice Cream Party
    • Star Wars
  • Occasions
    • Brunch
    • Bridal Shower
    • Bridal Shower Inspiring Tablescapes
    • Baby Shower
    • Baby Shower Inspiring Tablescapes
    • Birthday’s For the Young and Sassy
    • Girls Birthdays
    • Boys Birthdays
    • Sweet 16
    • Birthday’s for the Wise and Mature
    • Graduation
    • Baptism & Christening
    • Bar Mitzvah
    • Bat Mitzvah
  • Weddings
    • Engagement Parties
    • Wedding Ideas and Inspiration
    • Rehearsal Dinner
    • Real Weddings
  • Free Printables

April 30, 2017 by Emily Miller

DIY May The 4th Be With You Star Wars Banner!

DIY Star Wars Banner from B. Lovely Events

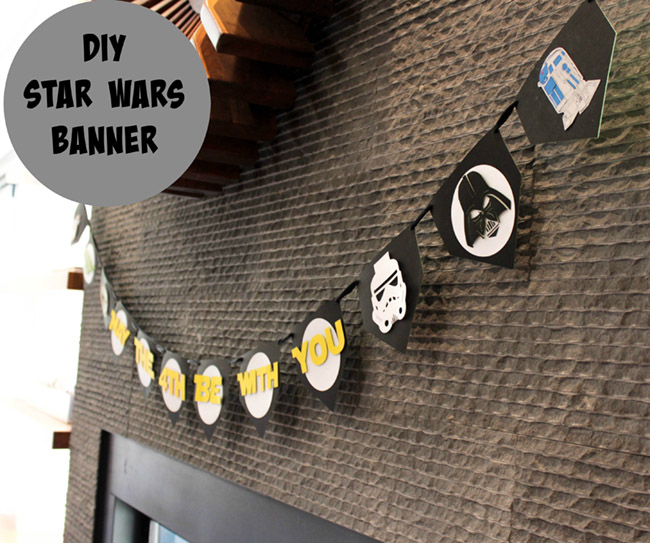
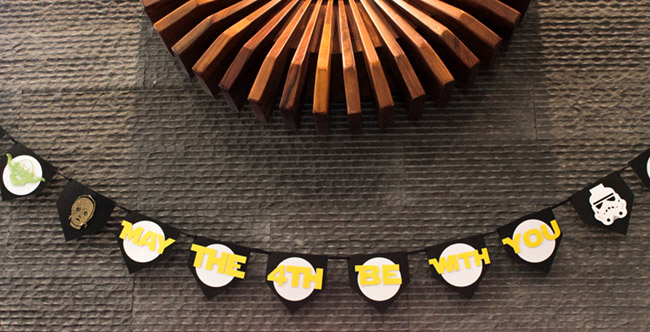
Star Wars! *cue the theme music here* May the 4th is right around the corner and  you know what that means? Honorary Star Wars Day! We can’t wait to celebrate. We have a fun project for you today to help you gear up for Star Wars Day; this awesome May The 4th Star Wars banner!  You can put together this awesome May the 4th Star Wars banner for your home, work or as a lovely decor piece for a Star Wars Party. This Star Wars banner has all of our favorite classic and even new characters on it like BB-8, Yoda , R2-D2 and Darth Vader. With just a few black and white images and a Cricut, you can make this banner in a jiffy! We will show you how!

(Hint Hint-this can be put together for any Star Wars party, you just have to change the 4th to force and you are good to go!)

DIY Star Wars Banner May The 4th Be With You- See how to make it on B. Lovely Events


Here is what you need:
• Cricut Air
• Cricut Tool Set
• Glue Sticks-Extra Strength Work Really Well
• 1 sheet of Core’dinations Grey Cardstock– This is to make BB-8 & R2-D2
• 5 sheets of Core’dinations Black Magic Cardstock– This is for the banner and darth Vader
• 2 sheets of 12×12 White Snowcap Cardstock– this with for the backdrop to the characters and the storm trooper.
• 1 sheet of Core’dinations Napa Valley Cardstock– This is for Yoda
• 1 sheet of Core’dinations Tangerine Cardstock-This is for BB-8
• 1 sheet of Red Cardstock-This is for R2-D2
• 1 sheet of AC Silver Glitter Cardstock– This is for BB-8
• 1 sheet of Core’dinations Gold Silk Glitter Cardstock– This is for C-3PO
• 1 book of DCWV Double-Sides Brights or Yellow Cardstock Paper– This is for the words
• Foam-Adhesive Squares
• 1 spool of Offray Black Double Faced Ribbon– To hang the banner

If you can’t find these online, they typically have more single sheets and ribbon in the Jo-Ann stores so we would try shopping there first. Also, it may be a good idea to get a little more than listed above in any color just in case you mess up a sheet. (Yes, we have been there!)

DIY Star Wars Banner May The 4th Be With You - See how to make it on B. Lovely Events

DIY Star Wars Banner May The 4th Be With You - See how to make it on B. Lovely Events


DIY Star Wars Banner Tutorial:
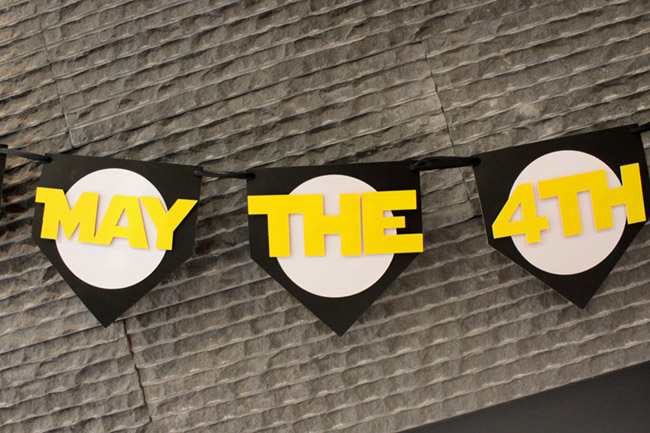
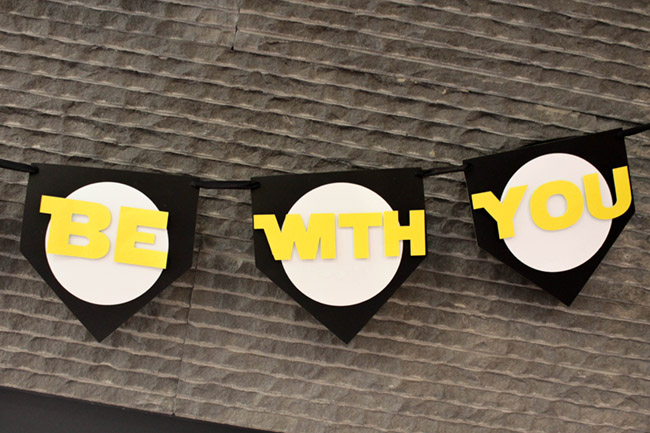
1.) First, let’s start with the banner, it is the easiest. Select your favorite banner option from the Cricut Design Space and use it as a template for your banner. I sized my banner 5” across and it should fit 4 to a page.


Note: Even if there are a bunch of cutouts on top of it like hearts or “Celebrate”, you can choose to just cut the main layer first to get the outline you want and then cancel the cut so you don’t get the other design it comes with.
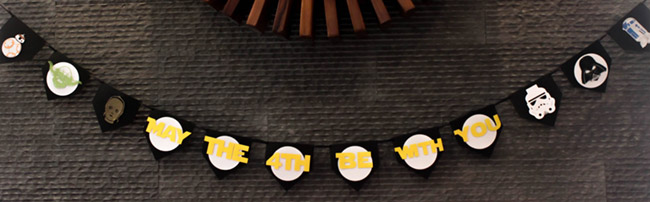
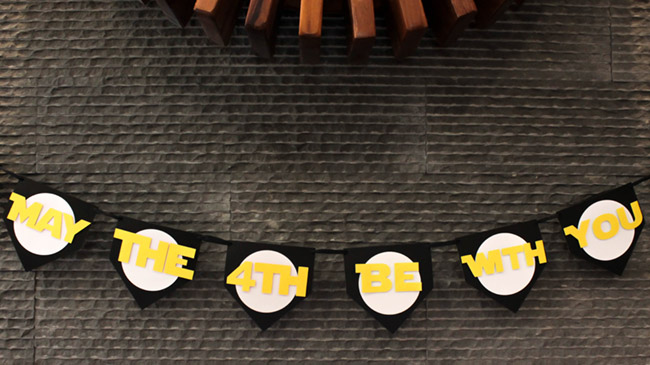
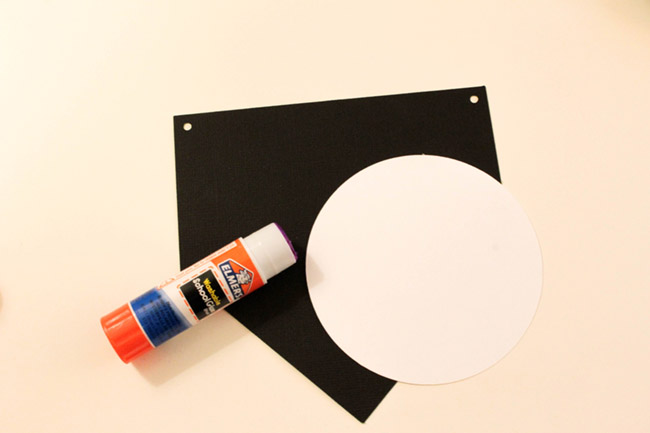
2.) Cut out a 3.58” white circle- you will need at least 8 of them. Then glue it to the middle of your banner

DIY Star Wars Banner Supplies


3.) Cut out May the 4th words.

In order to get the classic Star Wars font for your banner, you need to download a font. Luckily there is a free one from Font Space named Star Jedi that is prefect!

Then you are going to make your words on a Word Doc in large font and save them as a picture with your snippet tool. You can follow the instructions here for more details on that.

DIY Star Wars Banner- See how to Make it on B. Lovely Events


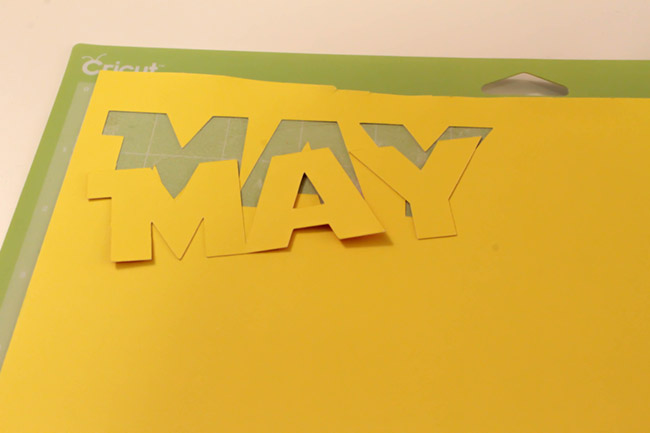
Use your adhesive squares to add some lift to your words to give them even more dimension.

DIY Star Wars Banner- See how to make it on B. Lovely Events


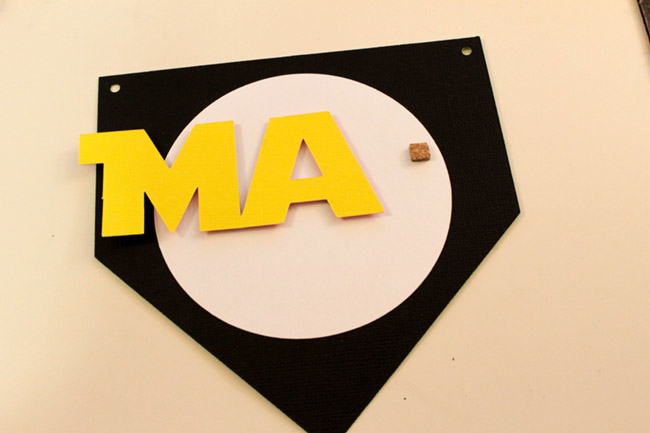
Once it’s complete It will look like this:

DIY Star Wars Banner May The 4th Be With You - See how to make it on B. Lovely Events

DIY Star Wars Banner May The 4th Be With You - See how to make it on B. Lovely Events


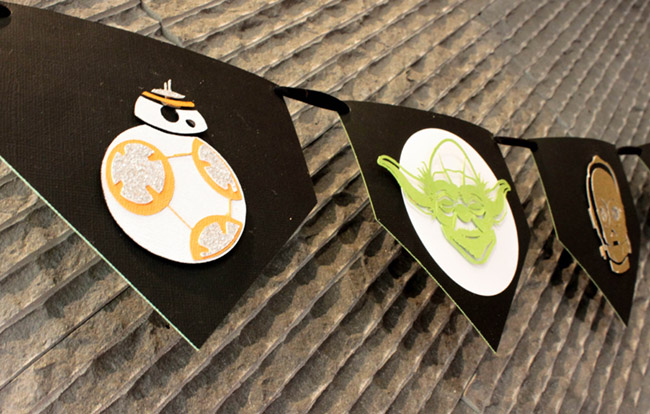
4.) Now to the characters! You are going to do something similar to uploading the word images to Cricut Design Space, but you will be uploading black and white images to be transformed to be cut. Lucky for you, you can find all of the black and white images in this post!
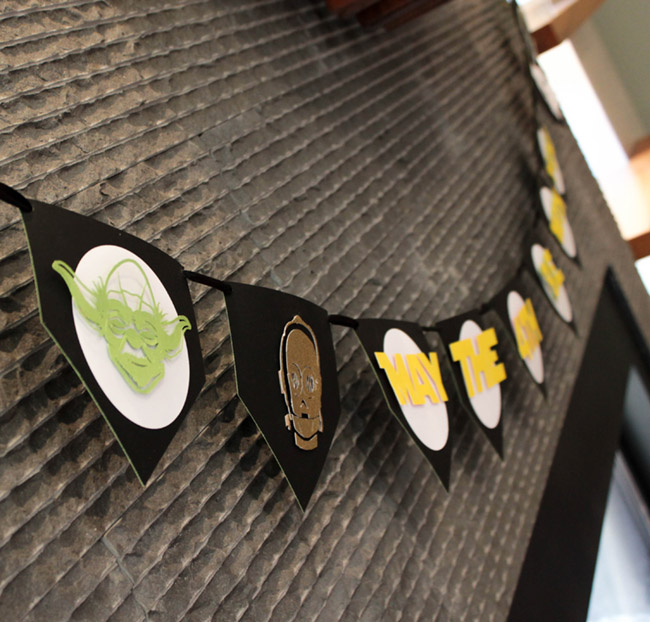
YODA


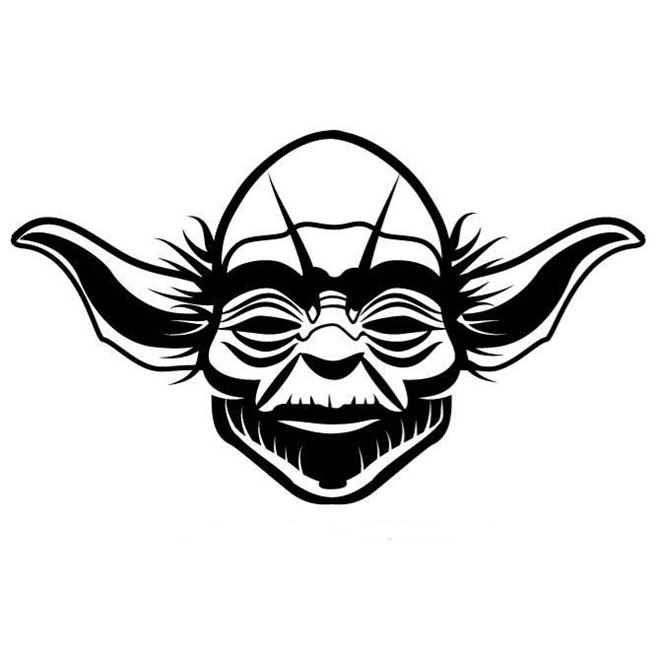
Take this image and save it and then upload it as an image to the design space. De-select all of the white space so you get an image like this.

This template will cut into this from your green card stock.

DIY Star Wars Banner May The 4th Be With You - See how to make it on B. Lovely Events


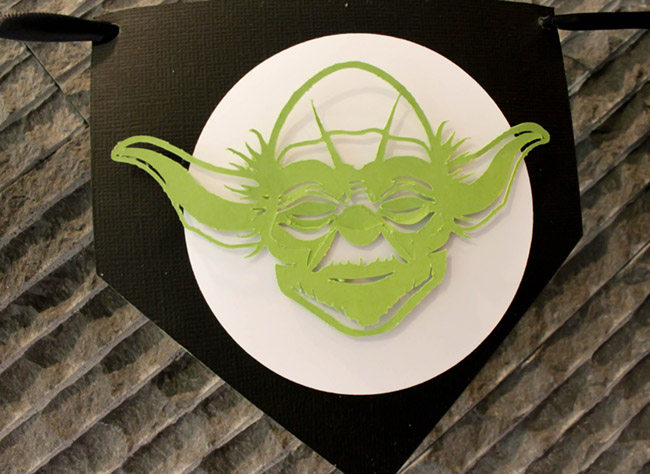
Pretty Neat! Also use the foam adhesive squares to give some dimension to your cut character designs. You may have to cut some so they don’t show through.

Helpful Tip!– Set the Cricut to light cardstock or 1-2 dials below so the blade can get the fine details without bringing the entire paper with it.
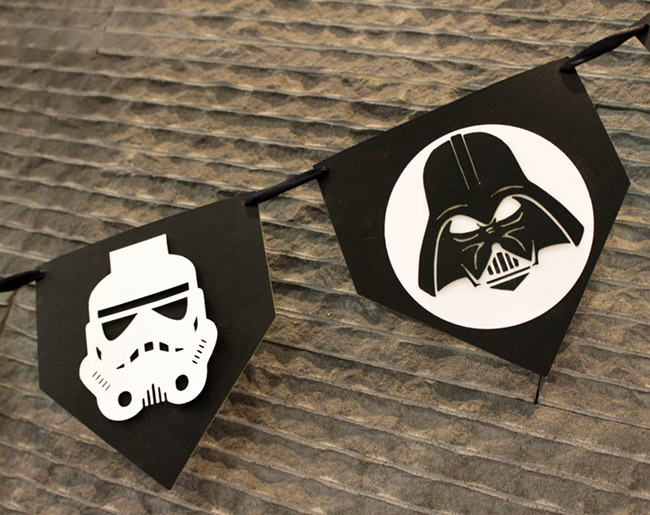
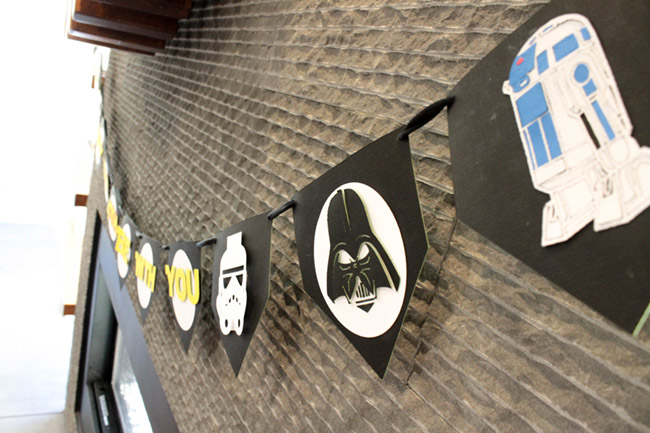
Darth Vader

Cut out of black cardstock

Vader DIY


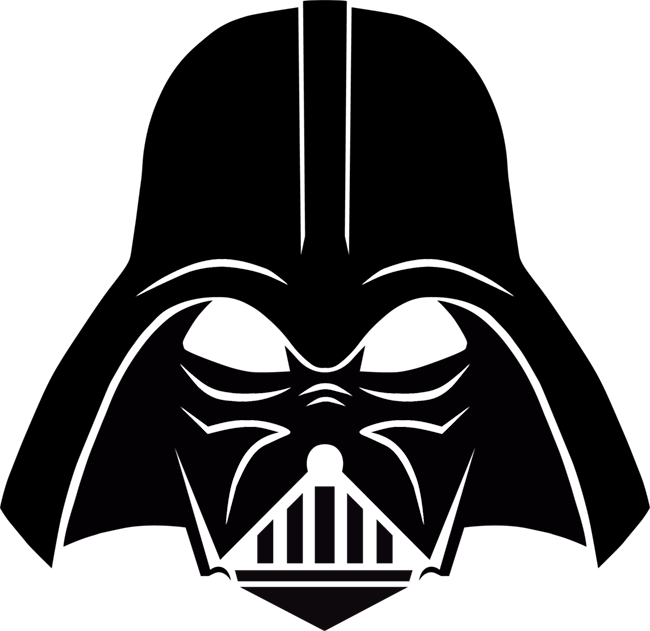
Make sure to mount his character on a white background circle so you can see his eyes and cut outs. Use the Cricut Spatula and weeder tool to get those small rectangles for his helmet.
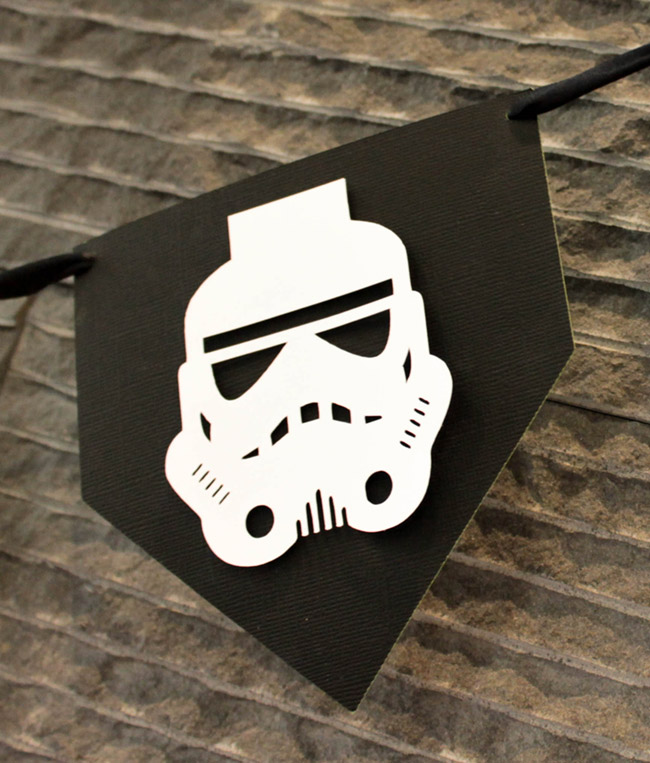
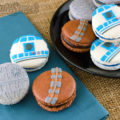
DIY Star Wars Banner May The 4th Be With You- See how to make it on B. Lovely Events

Storm Trooper

Cut out of white cardstock


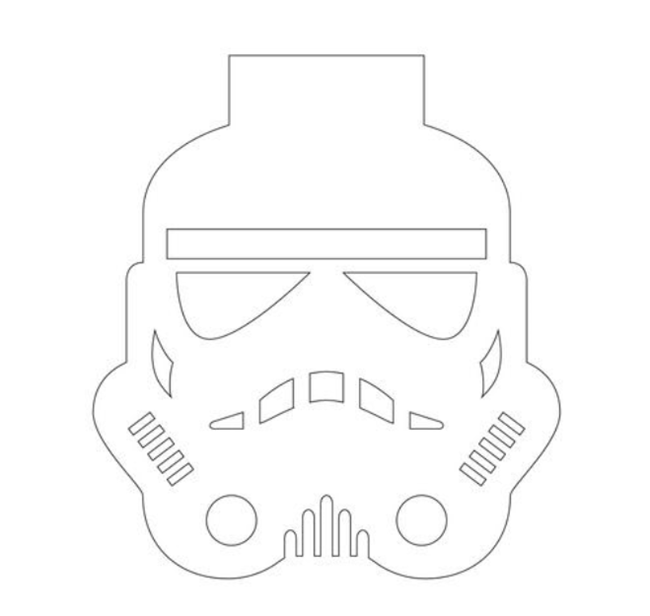
Be sure to mount him on a just on the black banner so his character can really pop.

DIY Star Wars Banner May The 4th Be With You - See how to make it on B. Lovely Events


C-3PO
Cut out of gold glitter card stock

DIY Star Wars Banner May The 4th Be With You - See how to make it on B. Lovely Events


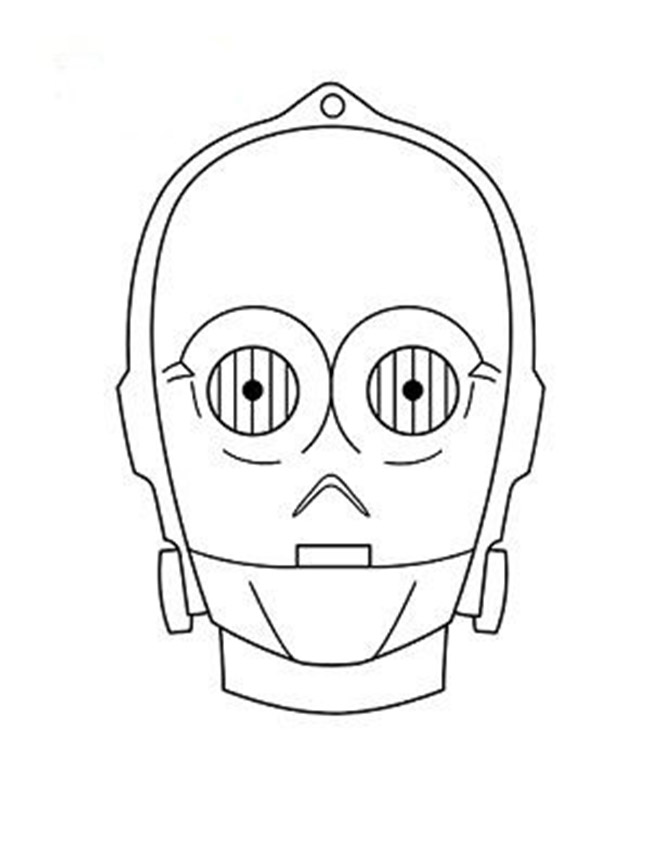
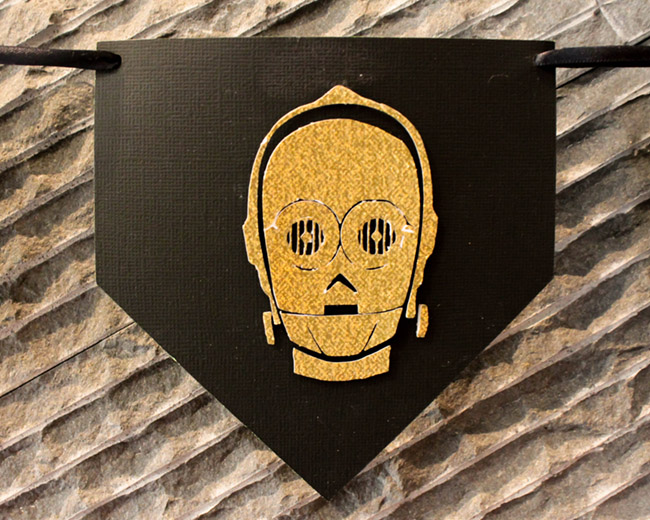
Be extra careful around his eyes and removing all of the rectangles there. Use very fine cut foam square adhesive for his bolts.

R2-D2
Cut out of grey, blue and red cardstock

DIY Star Wars Banner May The 4th Be With You - See how to make it on B. Lovely Events


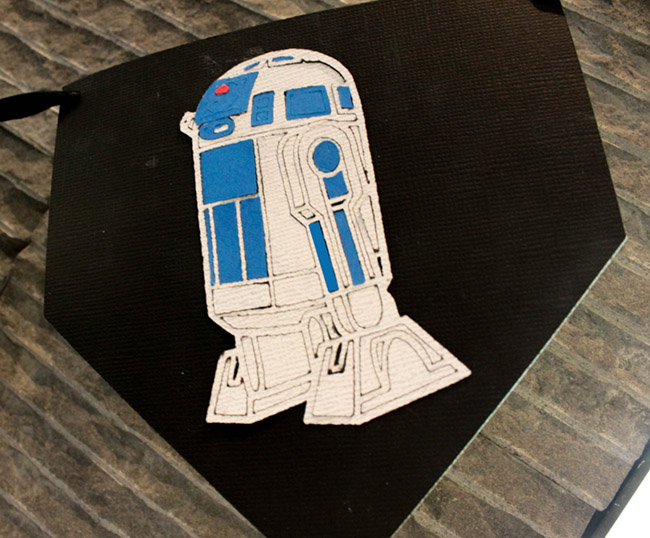
You are going to cut this image 3 times from each of the colors of paper. Start with the grey paper and weed the whole image off of the mat. Then cut the image out of blue paper and fill in its arms, chest and eyes with this. They match perfectly so they are easy to fill in! Then cut the image one more time from red paper and add in the eye.

BB-8
Cut out of grey, orange and silver glitter cardstock

DIY Star Wars Banner BB8 May The 4th Be With You - - See how to make it on B. Lovely Events


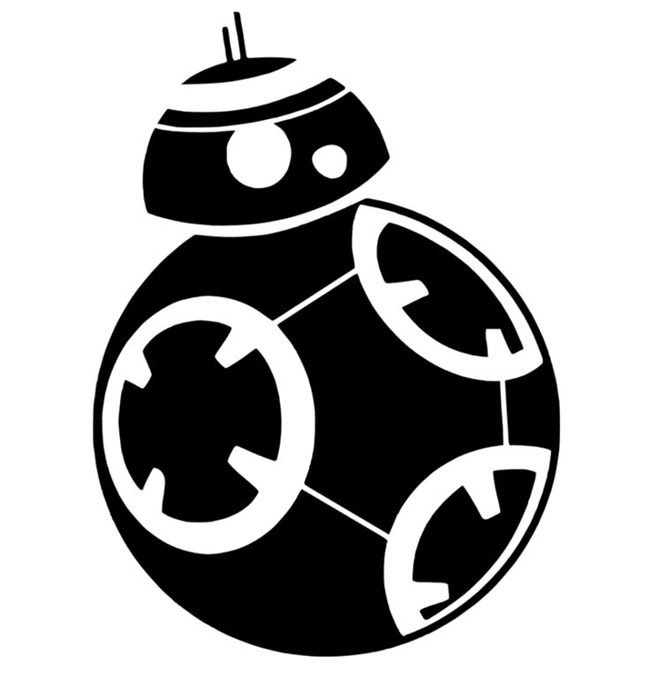
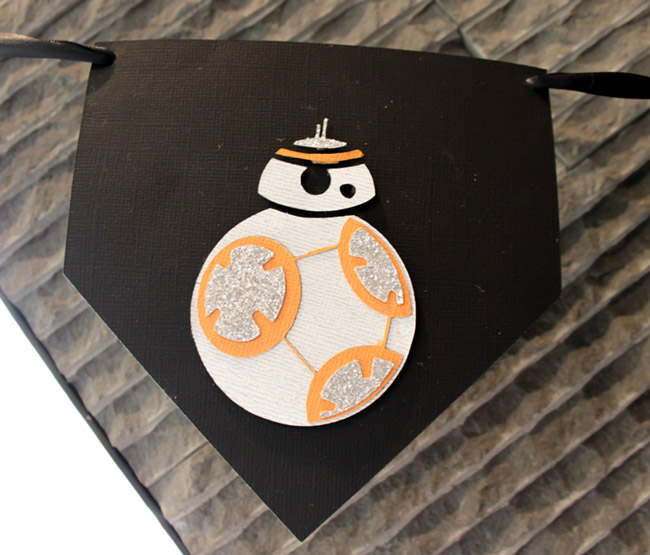
This character also needs 3 cuts from each of the colors of cardstock. First start off with the grey to form most of his body. Then cut the orange and take the circle parts of the cut and glue stick them on top on the grey cut out. Use one orange strip for the middle top of his head. Then cut out the image from the silver glitter paper. Glue the mid circles on top of the orange and add in the top part of his head. I absolutely love the added touch of the silver glitter! It really makes him stand out.
5.) Once you have all of your characters and the words mounted on the black banners, it’s time to string them up. I particularly don’t like seeing too much of the ribbon so I threaded mine to have most of the ribbon go behind the banner. If you like seeing more of the ribbon, thread it the opposite. Totally up to you!

DIY Star Wars Banner May The 4th Be With You - See how to make all the characters on B. Lovely Events

DIY Star Wars Banner May The 4th Be With You - See how to make it on B. Lovely Events


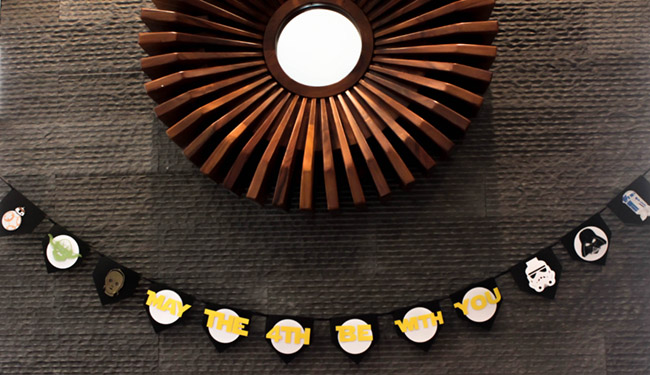
Now all that is left is to hang it where you think is best. We love hanging banners over the fireplace or even from the mantle but really this banner can go anywhere!

DIY Star Wars Banner May The 4th Be With You - See how to make it on B. Lovely Events

DIY Star Wars Banner May The 4th Be With You - See how to make it on B. Lovely Events

DIY Star Wars Banner May The 4th Be With You - See how to make these dark side characters on B. Lovely Events

DIY Star Wars Banner May The 4th Be With You - See how to make it on B. Lovely Events

DIY Star Wars Banner May The 4th Be With You - See how to make all the characters on B. Lovely Events

DIY Star Wars Banner May The 4th Be With You - See how to make it on B. Lovely Events


This is a sponsored conversation written by me on behalf of Jo-Ann. The opinions and text are all mine.


We are super loving this DIY Star Wars banner. Hope you have as much fun making it as we did!

DIY May The 4th Be With You Star Wars Banner! was last modified: June 6th, 2017 by Emily Miller

Share this:

  • Click to email a link to a friend (Opens in new window) Email
  • Click to share on Pinterest (Opens in new window) Pinterest
  • Click to share on Facebook (Opens in new window) Facebook
  • Click to share on X (Opens in new window) X
  • Click to share on Tumblr (Opens in new window) Tumblr
  • Click to share on Reddit (Opens in new window) Reddit

Like this:

Like Loading...

Related

Related posts:

diy-she-is-fierce-gold-foil-signMake This “She Is Fierce” DIY Gold Sign! The Star of Your 4th of July Party! DIY Congrats Banner Fun Star Wars Macaroons!May The 4th Be With You!

About Emily Miller

Emily Miller is the Founder, Writer and Party Stylist for B. Lovely Events, a blog that covers ideas and inspiration for all of life's celebrations. Emily loves celebrations of all types and everything that goes into them. She writes each day to inspire you to make the best celebrations that you can!

❮❮ Previous Post
Next Post ❯ ❯

Comments

  1. Neil says

    March 19, 2018 at 8:15 pm

    Perfect. We have an upcoming marking coming up in May for a character themed stall

    Great for our market or character themed Star Wars party.

    Thanks for sharing.

    Reply
  2. Brittany says

    April 26, 2018 at 7:44 pm

    EMILY! This is so amazing and i’m very excited to make it. But the downloads are giving me some trouble. All the links you have to click on keep taking me to the “Download the PDF Mac Master” website even after already downloaded it. How do I then open your file within the App?

    Reply
    • Emily Miller says

      May 6, 2018 at 2:11 pm

      Hi Brittany,

      There shouldn’t be anything to download. You simply just save the black and white photos of the characters and then use them to upload into Cricut design space. Hope that helps!

      Reply

Leave a Reply Cancel reply

Your email address will not be published. Required fields are marked *

This post may contain affiliate links, which means that if you click on one of the product links and purchase, I’ll receive a %. Thank you for supporting the sponsors we love!


Welcome to B. Lovely Events! Here you will find tips, trends, ideas and inspiration for all of your life’s celebrations. No matter how big or small, a holiday or an occasion, you can make it yours. Making it special for your loved ones and friends is what we think life is all about! Learn more →

~Connect With Us!~

rssfacebooktwitterpinterestinstagramgoogle+

search

Party More With Us!

Enter your email address to get more pretty in your inbox.

Join 1,596 other subscribers

B. Lovely Events Shop

Shop Our Lovely Cupcake Wrappers Today!


What Were Loving!

Visit Pinterest's profile on Pinterest.

cheap party dresses online at DHgate

  • Home
  • Holiday
  • Parties
  • Occasions
  • Contact
  • Our Shop
  • Facebook
  • Instagram
  • Pinterest

Pretty Chic Theme By: Pretty Darn Cute Design

This website uses cookies to improve your experience. We'll assume you're ok with this, but you can opt-out if you wish.Accept Read More This Site is affiliated with Monumetric (dba for The Blogger Network, LLC) for the purposes of placing advertising on the Site, and Monumetric will collect and use certain data for advertising purposes. To learn more about Monumetric's data usage, click here: http://www.monumetric.com/publisher-advertising-privacy
Privacy & Cookies Policy

Privacy Overview

This website uses cookies to improve your experience while you navigate through the website. Out of these cookies, the cookies that are categorized as necessary are stored on your browser as they are as essential for the working of basic functionalities of the website. We also use third-party cookies that help us analyze and understand how you use this website. These cookies will be stored in your browser only with your consent. You also have the option to opt-out of these cookies. But opting out of some of these cookies may have an effect on your browsing experience.
Necessary
Always Enabled
Necessary cookies are absolutely essential for the website to function properly. This category only includes cookies that ensures basic functionalities and security features of the website. These cookies do not store any personal information.
SAVE & ACCEPT
 

Loading Comments...
 

    %d